When I was growing up,
nail polish where: PINK or RED... end of the story.
But in the 21st century nails have to be in
TECHNICOLOR!
Like it? I like it.
And DO NOT like the idea to spend an arm and a leg (as usual)
in nail polish that will use for a month or so,
in nail polish that will use for a month or so,
get tired of it, and never use it again.
For 4.96$ I'll show you how to make your own
designer-look fancy shmancy nail polish!

ready? ...start!


Enjoy!!!
xox, d.
designer-look fancy shmancy nail polish!

VS/
 |
| Essie Chinchilly - O.P.I. Sky Teal We - Chanel Khaki Vert - Essie Barbados blue |
ready? ...start!
--> You need:


- an old bottle of nail polish (the one at the bottom of the drawer, completely dried out,... yes that one!)
- some q-tips
- nail polish remover or acetone
- cotton squares
- a metal bead that will fit into the nail polish bottle
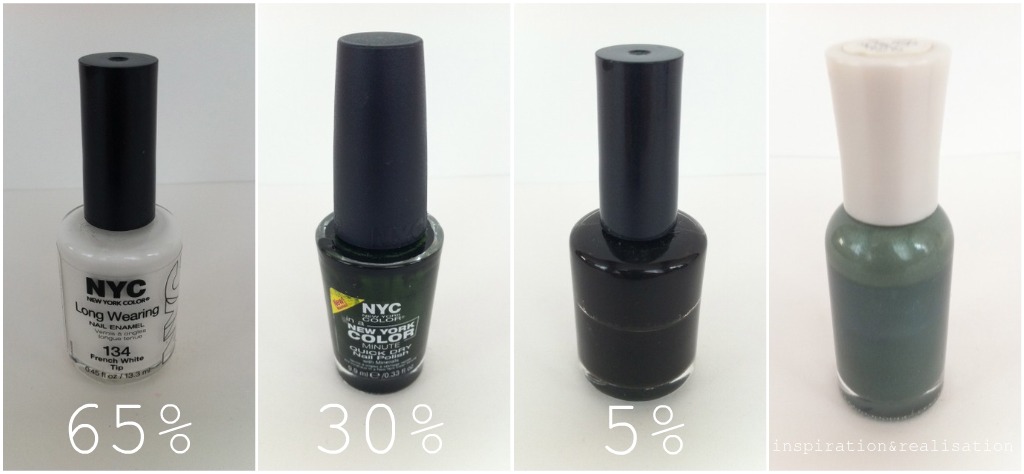
- NYC nail polish in these colors:
134 French White Tip 0.99$
115 Skin Tight Denim Crème 0.99$
214 Flat Iron Green 1.99$
119 Black Lace Crème 0.99$
119 Black Lace Crème 0.99$
--> Preparation
* empty the old nail polish bottle as much as you can, then fill it half way with the acetone and shake it well until clean.
* empty the acetone, and in case needed, pour some more until the glass looks clean.
* with cotton squares and q-tips clean the inside of the bottle cap, the ridges where the cap screws onto the bottle
* let dry well; only after it's really dry, you can pour some water and a drop of soap dish and clean it again, and rinse it out well. ...and let it dry completely.
Enough for the boring part!
Now it's time to have some fun with colors!!!
* follow the % of usage of the different colors
* I don't make a full bottle of each mix, just about let's say half bottle, so it won't dry out
* to make the % right, I count while I pour... make sense? 7 seconds = 70% ;)
* put the metal beads inside the bottle and ... shake, shake, shake
* try on your nail
* eventually adjust with a little bit more of this and a little more of that color


Enjoy!!!
xox, d.
0 comments:
Post a Comment